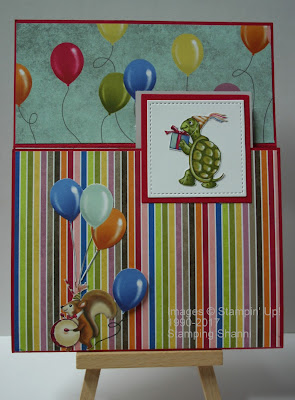
This is my Flap Fold Card, I used this tutorial on YouTube:
I love this suite! Birthday Memories remind me of the cards I would receive when growing up. . . that gives my age away right? So my base card is Real Red and I used the standard measurements that I would use for a square 6"x 6" card but folded the top flap down at 2.75" or 7cm and then the balance of the card was simply folded into the centre.
The gorgeous DSP is the new Birthday Memories Designer Series Paper and there are so many beautiful patterns and designs to choose from. The sheet that I have used has both the balloons and the colourful lines design so I only had to cut into one sheet! I also fussy cut from the same piece the turtle and the squirrel and the ballon and banner that you see above.
I stamped the sentiment Hip Hip Hooray from the Birthday Delivery set in Memento Black in the banner. The balloon was reinforced on another piece of card stock and dimensionalised to act as the little block for the top flap.
I love this turtle - it has so much personality! It is mounted on a piece of Whisper White card stock with the Stitched Edged Framelits mounted on a square of Real Red card stock cut out with the co-ordinating square from the Layering Squares Framelits which is only marginally smaller than the square used to cut out the base card. I cut the void out once I had adhered the DSP.
I cut the three balloons for the squirrel from another sheet of DSP from the Birthday Memories set - these were surprisingly easy to fussy cut. I adhered these direct to the DSP and luckily you can't see these when the top flap is down but they also suit when the flap is lifted. . .
This is what the whole card looks like opened fully. I cut the DSP to mount with the shading and fading marrying up with the void cut out of the centre. I added the lined piece at the bottom then a rectangle of Pacific Point to divide the pattern a little. The base for the message is Whisper White mounted on a rectangle of Pacific Point.
The Happy Birthday sentiment is Happy Birthday Thinlits cut apart. I think that the font marries in nicely with the balloons and images. My only reservation is in the adhering of the words - I was a little awkward. The sentiment is cut out of Real Red card stock.
As the final tie-in I stamped the fox from the Birthday Delivery set in Memento Black and coloured him in using the Stamping' Water Colour Pencils and a Blender Pen. I hand drew the string with a Journalling Pen to match the colours in the balance of the card.
This was a fun and easy card and I am sure that you have found a lot of inspiration in this month's hop. Don't leave us yet - check out Tanja's amazing creation this month!
Until next month, enjoy your craft and stay sparkly!
Shanni xx
Order of Blog Hop for June
1. Monica Gale (UK)
2. Martha Inchley (Canada)
3. Shannean Moncrieff (Australia)
4. Tanja Kolar (Germany)
5. Aude Barbara (France)
6. Miranda Mols (Netherlands)
7. Astrid Hofmann (Austria)
8. France Martin (USA)


